
PHP is one of the most widely used scripting language on the web. It is mostly paired with Apache or Nginx Web Server since both are open source software but there are cases when we need to run PHP on Microsoft's Internet Information Services (IIS) since there are a lot of companies that already using it in their environment.
Microsoft Internet Information Services (Web Server) is part of Windows Server. It is also available on Windows 8 Pro, 10 Pro or 11 Pro Version. You just need to activate it which we will discuss later.
To get started, we need to download some software from the web.
PHP
https://windows.php.net/download
*You can download the Non Thread Safe version. Select the zip file. It is the one compatible with IIS.
There are several versions of PHP available for Windows. PHP 7.0 to 8.1 and so on. These are all supported versions of PHP. You can always select the latest version which is 8.1 as of March 2022 unless you have older applications that needs the older version of PHP. It is recommended to update the PHP version as soon as it is released for security and stability.
Microsoft Visual C++ Redistributable
https://docs.microsoft.com/en-us/cpp/windows/latest-supported-vc-redist?view=msvc-170
*Download the version of Visual C++ Redistributable based on the version of PHP you are going to use. Refer to the versions below.
Visual C++ 2017 = VC15
Visual C++ 2015 = VC14
*Download the 64 bit version if you are using PHP x64 version.
URL Rewrite (This is the counterpart of mod_rewrite of Apache Web Server)
https://www.iis.net/downloads/microsoft/url-rewrite
Install the Visual C++ Redistributable after downloading it by clicking the downloaded executable.
Extract the downloaded PHP file on your local directory. You can place it on C:\PHP or anywhere in your drive as long as you remember the location.
On Windows 10 Pro or Windows 11 Pro machine, press the Window Key to open the Start Menu / Search. Type "Turn Windows features on or off".

You will see the window as shown below. Select Internet Information Services. You don't need to install all the features like FTP. Just make sure to install the following features.
- Web Management Tools > IIS Management Console
- World Wide Web Services > Common HTTP Features > (All Items)

Make sure to install CGI under World Wide Web Services > Application Development Features.

Once IIS is completely installed, you can test if it is running by opening your web browser like Microsoft Edge, Mozilla Firefox or Google Chrome and visit localhost. You should see the IIS Welcome Page.

Install the URL Rewrite that we downloaded earlier. Just click the downloaded executable.
Open Internet Information Services (IIS) Manager by searching for it using the Windows Search (Select Window Key then type the search keyword). You can also find it under Control Panel > Administrative Tools > Internet Information Services (IIS) Manager.

Select Handler Mappings.

On the Actions menu located on the right, select Add Module Mapping.

Enter the following info into the fields and click OK. Make sure to replace the Executable path with the path on your local machine where you extracted the PHP earlier.

Add "index.php" under the Default Document. Select your local machine from the left then select Default Document.

The Add button is located on the upper right corner.
The setup of PHP on IIS is now completed. To test if it is working, let's create a "phpinfo.php" file inside the webroot of IIS. The default location is C:\inetpub\webroot.
*When creating a PHP file, make sure that the file extension is correct. You don't want to create a file called "phpinfo.php.txt". The file extension is hidden by default on Windows. To show it, open any Windows Explorer and select the View menu. Check the File name extensions.

Enter the line below inside the "phpinfo.php" file.
<?php phpinfo(); ?>

PHP is now confirmed to work.
Now we need to enable some extensions like MySQLi that would be required to run common PHP applications like WordPress for it to be able to connect to MySQL database.
Before we are able to do that, we need to create the php.ini file inside the PHP directory. Duplicate the php.ini-production and rename it to php.ini.

php.ini file would contain all the settings for your PHP installation.
You just need to modify php.ini to configure PHP and enable extensions that you might need to run your PHP application.
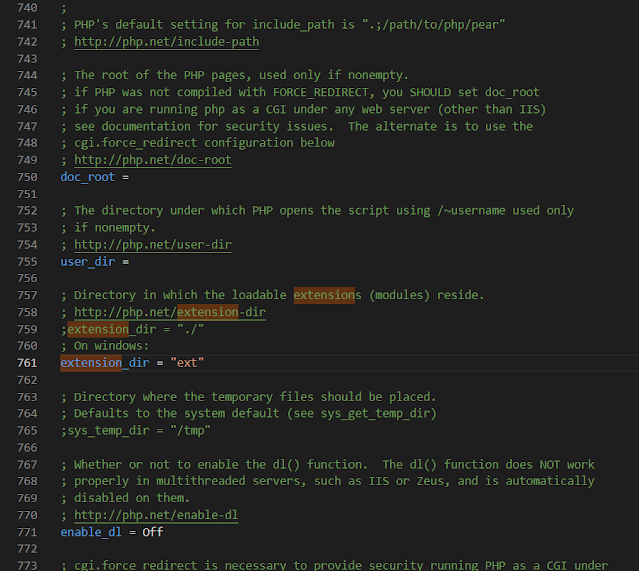
Don't forget to uncomment the extension_dir = "ext" by removing the semi-colon on the left. "ext" is the default folder of all the extensions which can be found inside the PHP directory. PHP can't find it by default. (Line number can change depending on the version of php.ini)
You also need to uncomment the extensions that you want to activate by removing the semi-colon on the left side as shown below.

Don't forget to save the php.ini file then restart the IIS.
To restart IIS, open Internet Information Services (IIS) Manager. Select the server from the left then click the Restart button on the right.

You can now run PHP applications on top of Internet Information Services.
Last Updated on March 2022.
Comments
Post a Comment